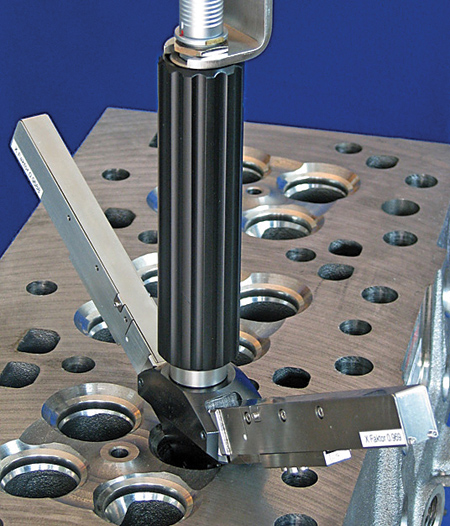
The VSM valve seat inspection system is suitable for use in automotive, small engine, off-road vehicle, motorcycle and diesel engine applications. The VSM is a manual gauge and uses mandrels armed with inductive built-in transducers. The mandrel is connected to a DC motor via a cardan coupling with clutch and a pair of gear wheels with stop cam. By turning 360°, the mandrel controls the difference between the seat and the shaft. The VSM consists of the mandrel, joint coupling, a hollow shaft and a driving component. "Unlike a CMM, it does not have a spatial frame of reference. The mandrel itself creates the reference between the geometry of the guide bushing and the valve seat," said a company spokesperson. It centers in the lower end of the bushing and in the valve seat. Therefore, the dual valve of the measurement results in a value according to the run-out of the bushing axis and the center of the valve seat. Ultimately, the mandrel develops a reference axis and measures the eccentricity of the bushing to this axis. Measurement by the VSM is fast, taking only three seconds for a reading.
The SIKO consists of a measuring head adapted to the valve seat, a universal linear slide and a measuring computer. When inserted into the cylinder head, it lays on the seat like a valve. After initial instruction the inductive built-in transducer (IET), with a diamond tip, scans into the seat. The IET slides over the valve seat, as well as over the fore and aft chamfers. The touching force is low, between 0.3 and 5.0 N. The travel of the slide is 5 mm, with a deviation of 0.2 m. After the measurement has been finished, the profile of the valve seat will be displayed on a monitor in a graphic and/or numerical format. The measurement by the SIKO is also fast, taking only eight seconds, resulting in a reliable reading.
In addition to measuring valve seat angle and valve seat width, the SIKO measures valve seat straightness/crowning plus it charts surface roughness and gauge line location. These features allow valve manufacturers to comply with today's rising performance standards for tolerances. When SIKO is inserted into the cylinder head, it lays on the seat like the valve. Then a built-in IET with a diamond tip slides over the valve seat and chamfers. After eight seconds the measurement is complete and the profile of the valve seat is displayed on the monitor.
A measuring head adapted to the valve seat, a universal useable single linear slide and a measuring computer come standard on the system. Options include the Slide Scan, which is a variation of the SIKO gauge offering dual slides resulting in no operator influence in the one-step measurement. Both gauges are designed for shop floor use and can withstand rough conditions while maintaining reliable measurements.
Euro-Tech Corporation is a North American distributor of Knäbel products and will spotlight Knäbel products.
For more information contact:
Euro-Tech Corporation
N48 W14170 Hampton Avenue
Menomonee Falls, WI 53051
262-781-6777
info@eurotechcorp.com
www.eurotechcorp.com
IMTS 2018 Level 3, Booth W-432453