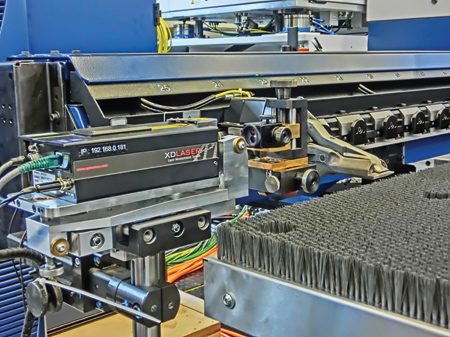
API XD Laser Interferometer installed on a TRUMPF TruMatic 7000 punch laser machine.
"When TRUMPF personnel saw API's XD Laser at a trade show, they immediately recognized that it could measure the three degrees of freedom (DoF) needed for production of their TruMatic 7000 punch laser machine in only a single measurement process," said a spokesperson. "A subsequent demo at TRUMPF's factory in Ditzingen, Germany, however, revealed more benefits than TRUMPF was anticipating. The XD Laser's interferometer and small size made it the perfect solution for the TruMatic 7000 punch laser machine, resulting in: fewer set-ups required to measure three DoF and straightness/alignment of the crossbeam; simpler measurement processes that can be easily repeated; increased accuracy due to reduced potential for human error."
The TRUMPF TruMatic 7000 punch laser machine processes steel plates weighing nearly 400 kg. "One incorrect position in the punching sequence and the entire plate becomes scrap," said the spokesperson. "Maintaining accuracy is vital, yet the process used to be complicated and time-consuming. The crossbeam extends more than 6 m. The tolerances required in measurements on the crossbeam are less than one-hundredth of a millimeter. The process required a combination of different measuring instruments and set-ups. The XD Laser's interferometer solved all of those problems."
The system provided all three DoF in just one measurement, was easier to handle than TRUMPF's other measurement tools and was able to accommodate the reflector in the measurement area due to its smaller size. An onsite demo revealed that the laser could also cover the full length of the cross beam, mainly because it no longer needed beam splitters and longer measurement distances could be taken. The previous process needed three set-ups, increasing downtime for the machine and the number of transfer points that can lead to errors.
After seeing the XD Laser, TRUMPF added the interferometer to its Development, Assembly, Service and Trial departments, as well as the Final Assembly and Service/Technical Customer Support departments. The Support department has begun taking the XD Laser to customer sites to assist in onsite calibration. The Development and Trials Department has taken the further step of automating the crossbeam measuring process by programming the laser to take two measurements, analyze the results and display them graphically. The user is guided through the entire process step-by-step. This automation also simplifies the overall process.
"The main reason for our decision to acquire new systems was certainly the ability to measure all three DoF in a single pass," said Michael Theurer. "The benefits are not limited to series production. Even when on-site with a customer, the new measurement process provides detailed statements about the structure, the alignment and the straightness in the Y and Z axes after only two hours, and we can provide all the data in a detailed report."
According to the spokesperson, the API XD Laser has reduced inspection and alignment times at TRUMPF while improving accuracies and reducing the potential for human error.
For more information contact:
Automated Precision, Inc. (API)
15000 Johns Hopkins Drive
Rockville, MD 20850
800-537-2720
www.apimetrology.com
TRUMPF Inc.
Farmington Industrial Park
111 Hyde Road
Farmington, CT 06032
860-255-6000
info@us.trumpf.com
www.us.trumpf.com