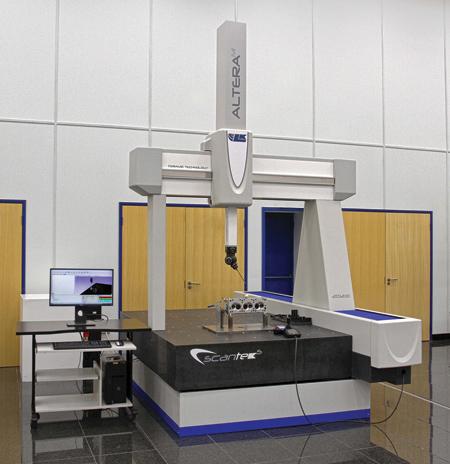
New LK Metrology ALTERA SCANtek 5 5-axis multi-sensor CMM.
LK Metrology, Inc. has introduced a new ALTERA CMM, called the SCANtek 5, that is coupled with Renishaw's REVO-2 scanning system and multi-sensor technology to offer manufacturers a 5-axis solution for inspecting dimensional accuracy and surface finish of components.
"The ALTERA SCANtek 5 features ceramic construction of the CMM beam and spindle, which combines optimal stiffness-to-weight ratio for enhanced responsiveness with mechanical and thermal stability for consistent performance across all manufacturing environments," said a company spokesperson.
The SCANtek 5 multi-sensor package includes Renishaw's MODUS software for importing data, controlling the CMM, acquiring results and reporting, including geometric dimensioning and tolerancing (GD&T) labelling. The machine's high scanning speed of 500 mm per second is engineered to boost measurement throughput, shorten production lead-times, provide a comprehensive awareness of product conformance and prevent the metrology department from becoming the bottleneck in the factory.
SCANtek 5 is available with a variety of standard measuring volumes from 800 mm x 700 mm x 600 mm (8.7.6) to 6,000 mm x 2,000 mm x 1,000 mm (60.20.10), with larger options. ALTERA M models with repeatability from 1.5 µm are being marketed alongside an ALTERA SL range offering repeatability from 0.7 µm.
"The SCANtek 5-axis CMM gives users a competitive advantage, making it easier to win new work and helping to bring products to market faster," said a company spokesperson. "A 3-axis measuring solution, by contrast, is often unable to measure some complex features. With the REVO-2 head synchronized with constant velocity machine motions when scanning, allows changes in component geometry to be followed without introducing dynamic errors," said the spokesperson.
"SCANtek 5 scans without the stylus leaving the surface of the component, allowing coordinates of up to 4,000 points to be captured on-the-fly every second, a rate of data acquisition far higher than is possible using conventional probing techniques," said the spokesperson. It is also possible to include rapid, single-touch routines into a measuring cycle. The flexibility offered by infinite head positioning can increase the effective measuring volume by minimizing the need for head reorientations, while allowing highly complex measuring. Exchanging the REVO-2 scanning probe for one of the vision probes can further increase data collection rates and the results can be correlated accurately with those acquired using tactile methods.
In addition, by employing different tip arrangements and knuckle joints, detailed surface finish analyses can be combined with other CMM measurements in a single operation, the basic output being Ra, RMS and raw data, with an extensive range of additions provided by standard and advanced surface texture options. Even fine bores down to 5 mm in diameter can be inspected. A variety of change racks, up to one meter in length, are available for housing sensors, probes and styli to enable automatic exchange during a measuring sequence.
"The MODUS software with its user-configurable interface provides a powerful platform for creation of programs, either by teach mode or from a CAD model imported via the usual graphical exchange formats or directly from CATIA, Siemens NX, Parasolid, PTC Creo or Solidworks," said the spokesperson. Wizards in the Windows programming environment employing conversational, graphical and drag-and-drop methodologies give access to a range of macros and standard scanning routines such as helical, circular and sweep to ensure best practice metrology, without the need for specialist programming skills. The native Dimensional Measuring Interface Standard (DMIS) program with drawing geometry, dimensions and tolerance data embedded can be simulated offline to check for potential collisions before the inspection cycle is run on the SCANtek 5.
"A wealth of textual and graphical reporting functionality is offered, including multi-part inspection for series production and real-time reporting during program execution," said the spokesperson. Data exchange to third party applications such as Excel, XML or SQL is provided, as well as to Q-DAS for statistical process control.
For more information contact:
LK Metrology, Inc.
12701 Grand River Rd.
Brighton, MI 48116
810-263-6100
www.lkmetrology.com