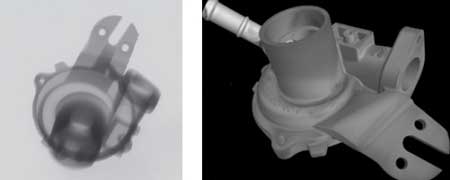
(l) 2D X-ray image (r) Reconstructed 3D volume

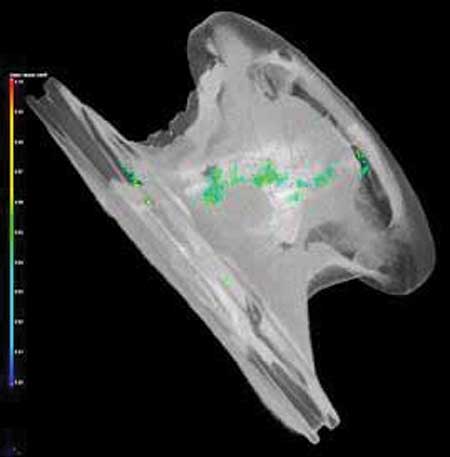
CT reveals voids in castings.
A microfocus computed tomography (CT) system from Nikon Metrology is being used by BorgWarner Poland to improve research and development of turbochargers for passenger cars, light trucks and commercial vehicles. The high power (450 kV) X-ray equipment is able to penetrate the dense materials used in turbocharger production, allowing the internal material quality of castings to be checked non-destructively and the integrity of welded assemblies to be inspected. In addition, dimensional data for specific components is acquired more quickly than is possible with a coordinate measuring machine (CMM), both from external and internal dimensions, according to the company.
Due to Euro 6 emissions regulations in Europe - which further cut the amount of harmful gases and particulates allowed in a vehicle's exhaust - manufacturers of engines and their suppliers are deploying ever more advanced technology in the design and development of air management systems. "The goal is not only to reduce pollution, but also to improve fuel economy and enhance vehicle performance," said a company spokesperson.
BorgWarner's three production plants on the Podkarpacki Science and Technology Park in the Rzeszów area of Southern Poland include a production facility constructed in 2009 with the capacity to produce more than one million turbochargers annually. They are used in petrol and diesel engine cars built throughout Western and Eastern Europe. A new Technical Centre recently opened on the same campus, to serve BWTS turbocharger production by providing application engineering and design, simulation, testing and validation as well as material analysis. "This development significantly broadened U.S.-owned BorgWarner's engineering, research and development capabilities within Europe," said the spokesperson.
Combined NDT Defect Analysis and Dimensional Inspection
It is in the new Technical Centre in Poland that the Nikon Metrology XT H 450 microfocus CT system was installed in February 2014. "We buy our turbocharger parts, ranging in size from aluminum compressor discs to stainless steel or cast iron housings, from a number of different sources," said Lukasz Krawczyk, Team Leader / Material Laboratory Manager. "Before we put an assembled turbocharger onto an engine emulator for endurance and thermo-mechanical testing, we need to check the quality of the individual components and sub-assemblies.
"Previously we did this by sectioning sample castings and machined prototypes and checking them on a CMM. But that meant we were wasting valuable prototype or pre-series components. Additionally, the parts we were testing were representative examples from the same batch, rather than the ones we actually inspected, which were of course destroyed. Now we know that the components under test are only the ones we inspected dimensionally and, in the case of castings, for the presence of porosities or inclusions as well."
Overall, much more information is available than previously, according to the company. This enables more rigorous analysis, and money is saved as parts can be reused for further tests. Software enables correlation of any inspected volume against a CAD model, or a master sample, either via direct comparison or through GD&T (geometric dimensioning and tolerancing) measurements.
"In castings, for example, it is possible to ascertain the location and size of a void or crack emanating from it and determine the likely cause of the fault and whether it is due to the type or quality of the material or the component design," said the spokesperson.
Also, a bearing assembly can be X-rayed to check that all components are present, avoiding the cost of dismantling. The electron beam weld that joins the impeller to the shaft can be inspected to check for porosity and mechanical integrity - a job that is impossible to do visually, according to the company.
"CT has become much more widely accepted of late as an inspection technology and is so flexible it is used wherever possible in preference to CMMs and other metrology equipment on site," said Krawczyk.
Selection of the CT System
Five potential suppliers of high power CT systems were reviewed by Krawczyk and his team. "The Nikon Metrology 450 kV microfocus system was selected, as it had an ideal specification for BorgWarner's applications, producing a higher level of image detail for more comprehensive analysis and measurements," said the spokesperson. "It was also the best value for our money, bearing in mind that both a flat panel detector and a curved linear diode array (CLDA) were included in a single system, whereas other vendors were offering either one or the other. It is easy to swap between detectors to suit the level of resolution required and the material being inspected.
"A flat panel is best for obtaining an image of a complete component and is the preferred mode for scanning quickly to detect defects. CLDA, on the other hand, takes a one-dimensional section image to build a more detailed picture of a part. This technique is ideal for preventing X-ray beam scatter when dealing with denser materials such as those used for turbine housings. The latter mode is also used for metrology, due to the high level of detail generated."
Another cost-saving benefit that the XT H 450 offers is that the price of filaments is low, and they can be exchanged by the machine operator without having to call in a service technician. "The equipment producer gave us excellent service with rapid response to technical issues and requests for advice," said Krawczyk.
Background to CT and the Nikon Metrology XT H 450
"Today's manufacturers face shorter lead times for introducing new products at lower cost, and the number of prototype iterations is consequently fewer," said the spokesperson. "Destructive testing is no longer wanted, as a multitude of tests need to be carried out on a single prototype. Tactile or scanning CMM inspections provide dimensional insight of outer dimensions but can only investigate complex internal structures if the sample is cut or disassembled. CT offers a solution that is easy to use, fast and provides detailed insight for dimensional, material structure and assembly inspection, resulting in faster problem solving and more effective decision making."
CT is fundamentally a simple process. An object is placed on a rotating stage between an X-ray source and a detector, which acquires simple 2D radiographic images of the object as it rotates. After the object has turned through 360 degrees, the 2D X-ray images are reconstructed into a 3D volumetric map of the object. Each element is a 3D pixel (voxel) which has a discrete location and a density. Not only is external surface information acquired, as with a 3D point cloud from laser scanning, but data on internal surfaces is also revealed and by mapping the density, information is provided on what is between the surfaces.
The X-ray tube is at the core of a CT system. Several different open or closed tube designs exist, but essentially an X-ray source consists of a cylinder in which there is a filament (similar to a light bulb) at one end, together with a high voltage cathode and anode, a magnetic lens and a metal target, normally tungsten. "Nikon Metrology provides in-house designed, open tube sources that allow the filament to be replaced regularly, resulting in lower cost of ownership compared with closed tube sources, which are replaced at considerable expensive when they fail," said the spokesperson.
A current is applied to the filament, which causes it to heat up and emit electrons. The electrons are repelled by the cathode and attracted to the anode by the high voltage field, which accelerates the electrons up to 80 percent of the speed of light toward the end of the tube. Before they leave it, the electron beam is focused onto the target material using an electromagnetic lens. The electrons slam into the target and 99 percent of the energy is expended in heating it.
Less than one percent produces X-rays that are generated in a cone beam from the target. The higher the voltage applied, the more energy is in the beam, and consequently the more power is transferred to the target, the larger the spot size and the more X-ray power is produced.
"A limitation of CT in industrial applications is that high material density, especially of metals, attenuates the X-rays more," said the spokesperson. "Many system suppliers only offer microfocus sources up to 225kV, while their more powerful sources are mini-focus, producing more X-ray flux but with a spot size an order of magnitude larger, reducing the accuracy of the data collected. A microfocus source is needed to acquire accurate and detailed CT data for most high-accuracy industrial CT applications.
"The Nikon Metrology XT H 450 delivers 450 W of continuous power, without any restriction on measurement time, whilst maintaining a small spot size of 50 to 113 microns and delivering a scatter-free CT volume with 25-micron repeatability and accuracy. Samples weighing up to 100 kg can be inspected within a 400 x 600 x 600 mm working envelope, providing a combination of 3D NDT defect analysis and dimensional inspection in a single, highly productive facility."
For more information contact:
Nikon Metrology, Inc.
12701 Grand River Rd.
Brighton, MI 48116
810-494-5616
marketing.nm-us@nikon.com
www.nikonmetrology.com