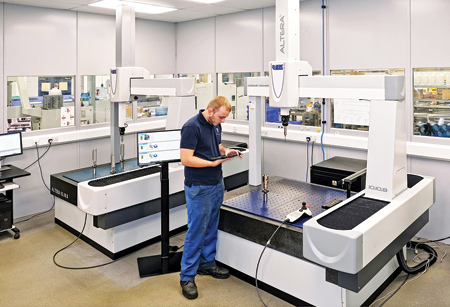
A machinist in the inspection room at Wilford at the end of a measuring cycle on a Nibron (high-strength copper-nickel alloy, or cupronickel) component that he was previously responsible for loading onto the LK AlteraS 10.10.8 with the help of Launchpad (seen on the screen to the left). Results are displayed on his networked tablet and may also be called up on the static screen. The software will be enhanced to include functionality that allows the operator on the shop floor to be alerted when a measuring cycle is complete.

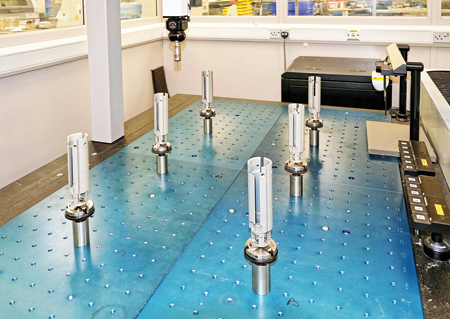
Six hard anodized aluminum oil exploration components batch loaded onto the table of the LK AlteraS 15.10.8. Up to 12 smaller components may be placed on the table with the help of permanently located, pre-drilled fixture plates attached to the granite. This machine has a specification that includes accuracy starting at 1.8 µm + L/400, a repeatability of 1.7 µm and speed and acceleration of 762 mm/sec and 2,306 mm/sec. sq.
Two coordinate measuring machines (CMMs) manufactured by LK Metrology have largely superseded the use of a pair of smaller capacity, 15-year-old machines in the inspection room at contract machining specialists WLR Precision Engineering, Wilford, Nottinghamshire (www.wlrprecision.co.uk).
To enable production operators as well as quality inspectors to operate the new CMMs and access the measurement reports easily, the machines have been supplied with LK Launchpad, an icon-driven, touchscreen operator menu, and a network of viewing screens and tablets. The simplified operator menu lists all the available inspection programs and the exact position the part should be placed on the machine table for inspection, giving operators the confidence to perform measurement tasks in just a few clicks. It enhances flexibility and opens the system for use by non-specialist CMM operators. Measured results and automatically generated reports may be shared between screens, tablets and other networked devices for easy access and viewing from any location.
WLR is widely regarded by its customers as an all-encompassing service provider, as in fulfilling virtually every contract it manages through the entire production process. A proportion of the value of each part is rigorous metrology, often involving 100% inspection. Contracts are received from the oil & gas, pharmaceutical, medical, laboratory and scientific instrumentation industries, which place great reliance on the accuracy and consistency of parts delivered.
WLR's Sales Manager, Tom Parr, said, "The increasing confidence that our customers have in the accuracy and consistency of components they receive from us has resulted in our winning considerably more business in virtually every sector that we serve."
What has helped in raising that level of confidence was the purchase in 2015 of the first LK CMM, an AlteraS 15.10.8 with a measuring volume of 1,524 mm x 1,016 mm x 813 mm. It quickly transformed quality control activities in the Wilford factory, making it faster, much more efficient and less labour-intensive in regards to measuring parts and preparing inspection reports. The machine's acquisition was triggered by a steep increase in components ordered by key customers coupled with a requirement for more comprehensive, 100% inspection and detailed reporting. Soon afterwards, a customer in the defence sector had a similar requirement for the provision of traceable measurements and certified reports covering the supply of critical, matched components.
A major benefit of the CMM is its large table area, approximately 1 m x 1.5 m, which can accept up to 12 identical components at a time for batch inspection, instead of just one as on either of the older CMMs. "It is unusual within the manufacturing industry to see a measuring machine nested with multiple components in this way, but the subcontractor attests that it is a perfectly feasible way of operation," said a spokesperson. Typically, five batches can be inspected during a day shift with a load time of about five minutes between each batch.
After components have been placed in-situ, an inspector presses a button and every part is measured in a single, automatic cycle, the longest of which is two hours. The person is thus free to work elsewhere on other metrology equipment for most of the day and the time the inspection will take is known exactly. Efficiency is much increased compared with the former method, whereby an inspector was committed to sitting by a CMM all day loading each part individually prior to every automatic measurement cycle, all of which took an indeterminate amount of time that was longer than the equivalent automatic batch cycle.
With the previous metrology route, subsequently preparing reports by hand on 12 inspected parts would take typically three hours, which was not just time consuming but also tedious. Now, time savings are significant due to CAMIO's ability to perform the task fully automatically. A comprehensive, graphically supported inspection report is generated on an entire batch in a matter of minutes, covering 30 or 40 critical dimensions on each part, complete with color-coded content in the event of any nonconformance. The report data is exported, via a CSV-type file especially formatted by WLR, directly into an Excel spreadsheet.
All of these advantages have led to a considerable enhancement in inspection and reporting efficiencies at WLR, allowing the subcontractor to accommodate a surge in orders from several customers. It has also helped employees to cope with a steadily increasing level of business across the board that has seen half a dozen parts ordered by some customers three or four years ago increase by up to 10-fold today. This has been managed without employing any extra people due to automation in the inspection room and on the shop floor.
LK Launchpad Deskills and Automates Inspection
By May 2021, a further increase in batch measuring capacity was needed. A requirement was also introduced for in-process inspection of a particular family of components for one customer. This time a smaller LK AlteraS 10.10.8 with a working volume of 1,016 mm x 1,016 mm x 813 mm was purchased, together with the latest CAMIO 2021 and the additional LK Launchpad software. The easy-to-use graphical interface enables not only the two WLR quality inspectors and Quality Manager Tony Blood to load parts singly or in batches of up to six at a time, but also the 10 day shift and five night shift machine operators.
Launchpad makes it simple to load the correct program for inspecting a component, which is easily identified from stored data, with details called up via simple graphical menus and icons on a screen positioned by the machine. The operator can locate the component by selecting the customer by name, via the part category, or by directly calling up the part itself complete with details of the machining process. Set-up on the CMM is straightforward, assisted by 12 mm thick aluminum fixture plates pre-drilled with a grid of holes at a 50 mm pitch fitted across the granite table of the machine. The operator simply places the component in a numbered location on one of the fixture plates, as indicated by the Launchpad graphic, and starts the measuring program by pressing a button on the touchscreen.
For convenience, the same inspection results that appear on the screen adjacent to the machine are also available on networked tablets used by machinists on the shop floor, and the information may also be shared with other devices. It enables more robust inspection and less downtime, as well as creating an environment where machinists become invested in the procedure. The next step will be to include functionality that allows operators to be alerted via their tablet when the measuring cycle is complete, so there will be no need for the person to keep an eye on the time.
Pre-drilled location plates are a feature on the granite of the larger LK CMM as well, assisting loading of components in batches or individually on that machine too prior to inspection. Launchpad software is also used, so both machines may be employed for either batch inspection or for operation inspection by shop floor staff, further increasing the efficiency of the quality control department.
CMM Programming from CAD
Another plus point, introduced at the time the first LK CMM arrived, is the ability to program the machines directly from CAD. Before the new LK CMMs arrived, it was sometimes necessary to produce a first-off component for a customer in up to six operations on a succession of machine tools, then take the part repeatedly to the inspection department to be measured and subsequently corrected if necessary. After it had been finished machined, the component was used as the basis for teaching a measuring program into one of the older CMMs. Now, in the same way that a metalcutting program is derived directly by a CAD/CAM system from an electronic model of a customer's component, the DMIS inspection cycle for the LK CMM can be created from the same CAD model using LK CAMIO software in advance of the first part being produced.
All inspection routines for both LK CMMs are now prepared this way in CAMIO, which performs not just programming but also analysis of the captured data and automatic reporting of the results. The measurement program enables the first-off part to be checked immediately on its first visit to the AlteraS 15.10.8. Programming time is quicker than before, but the biggest plus is that it is completed offline, so the CMM is not occupied, allowing inspection of components to continue uninterrupted. Together with the benefit of multisensor capability, permitting the use of a Renishaw SP25 scanning probe or a Nikon LC15Dx laser scanning head instead of a touch-trigger probe, measuring throughput has been raised significantly.
On the implementation of the successful metrology upgrade at WLR, Blood commented, "Our new measuring processes can be used by personnel with a wide range of experience levels. The high degree of automation, plus the ability to increase speed by scanning as well as touch-probing, has helped us save time and remove inspection bottlenecks.
"Automation and deskilling of operations have also allowed us to enhance inspection efficiency without adding to our headcount. Added to this, every day there is a further economic advantage through the ability to run the CMMs unattended for up to two hours at the end of each day shift due to our strategy of batch loading."
The parts produced typically range in size from about 5 mm square up to 115 mm in diameter by 250 mm long. At one end of the scale they are milled, turned, ground, spark eroded and diamond lapped from free cutting brass, aluminum and stainless steel, but very often they are machined from the toughest of alloys, including Inconel 718, Invar or Hastelloy.
Consistently high precision is key here, with machined tolerances normally of the order of ± 25 microns, but also down to ± 3 microns, if necessary.
"Nearly all components are inspected on our highly productive LK CMMs," said Blood. "There is enough spare capacity now to provide our customers with additional inspection and certification services."
For more information contact:
LK Metrology, Inc.
29550 W.K. Smith Drive, Unit B
New Hudson, MI 48165
810-263-6100
sales.us@lkmetrology.com
www.lkmetrology.com