Ray Harris inspects a scaled-down race car wheel for wind tunnel testing.

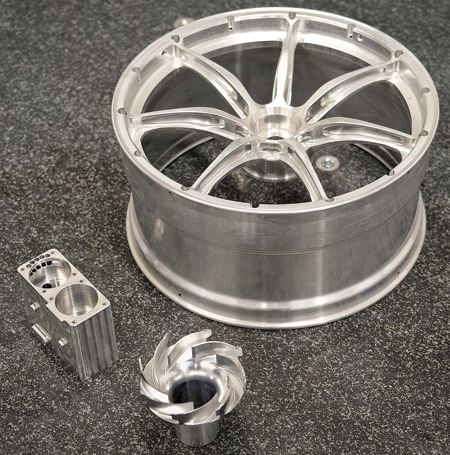
Typical components, all machined from solid aluminum, inspected by Driven Engineering on the LK CMM. Clockwise from back: a scaled-down race car wheel, an impeller and an aircraft fuel pump component.

The aircraft fuel pump solid model on the screen in PolyWorks Inspector (left) and a report generated automatically by the software after CMM inspection.
Much of subcontractor Driven Engineering's turnover comes from Formula 1, although the cost cap imposed on teams over the past couple of years has reduced it somewhat, leading to a greater focus on aerospace, automotive and general engineering work. Owner Ray Harris has historically machined mainly jigs, fixtures and molds for F1 teams, which were telling him that to break into the supply of parts for race cars, he would have to improve his component inspection procedures and quality reports.
Harris placed an order for an LK Metrology AlteraC 10.7.7 CMMs. During its build, the machine was reduced in height by about 100 mm so that it would fit through the entrance to Driven Engineering's latest factory unit and sit comfortably within a new quality room that was being added. As part of the deal, a single license of PolyWorks Inspector software was supplied, which is swappable between the CMM and an articulated arm purchased in 2020.
Harris said, "Although LK is a sizeable operation that is celebrating its 60th anniversary, it has a small-company feel. I got the impression that I would receive good support and back-up, which so far has been the case. In addition, the CMM is well-built and the software provided is easy to use, including on the portable arm."
The step up to CMM metrology immediately brought in extra F1 work, mainly prismatic machining on three Hermle 5-axis, high-speed machining centers, two of which are fitted with automatic pallet storage and retrieval systems for automated, 24/7 operation. Parts produced are typically for hydraulic manifolds as well as the race car front and rear wings and floor. A lot of titanium is processed, plus stainless steel, aluminum and some engineering plastics.
"Unlike jigs and fixtures, which have fairly open tolerances, the latest parts have drawing tolerances down to 25 µm true position, which is impossible to check using the portable arm," said Harris. "The CMM, however, is able to measure much smaller features, so it is easily capable of completing these inspection tasks."
During programming in PolyWorks, Harris simply picks the features and profiles he wants to inspect. The software then automatically sequences the points for the most efficient inspection routine, including all axis movements, head rotations and collision avoidance strategies. He noted the software is particularly easy to use and ideal for someone new to CNC CMM operation. Data is captured both by touch-probing discrete points and tactile scanning using a Renishaw SP25M probe.
"More data is generated in a shorter time compared with touch-trigger probing only, enabling faster inspection and hence improved quality control," said an LK Metrology spokesperson. "It also allows more comprehensive reports to be populated with richer information on the accuracy of freeform areas on components as well as dimensions. The PolyWorks software is able to present this data flexibly in a form that the customer prefers and is able to understand easily."
The pre-existing arm was supplied with a touch probe and a laser scanner, but now is used exclusively with the latter sensor for speed of operation when inspecting, for example, one in five of a batch of 920 aluminum mold tool halves having a complex profile, machined for the aerospace industry. The CMM, on the other hand, was supplied with tactile probing capability only, although it was prepared for laser scanning with a view to adding that capability in the future.
Before he invested in the machine, Harris was able to view a demonstration using a water system for an F1 car together with the CAD model. LK demonstrated two ways of inspecting the component, first by touch-probing to orientate it on the granite and then laser scanning, and secondly using an SP25M to probe and touch-scan the part.
Impressed with the latter metrology process, Harris decided to make the investment in the CMM and PolyWorks, and their ease-of-use is helping his inspection productivity. Programming, due to the level of automation provided by the software, can be carried out in as little as 10 minutes, depending on component complexity and, unlike when using an arm, can be done in advance from the CAD model.
Installation of the CMM has opened up a number of avenues, as availability of advanced metrology makes new business easier to win, especially tight-tolerance work. Additionally, Harris has now bought a Ginetta GT race car to hire out for events and intends to start manufacturing a proprietary range of parts for it, such as uprights, bearing supports, axle extensions and drive shafts. The ability to control their quality on the LK CMM to a higher level than would previously have been possible will also enhance this new enterprise.
For more information contact:
LK Metrology, Inc.
29550 W.K. Smith Drive, Unit B
New Hudson, MI 48165
810-263-6100
sales.us@lkmetrology.com
www.lkmetrology.com